How to Print Your Indie Comics with Mixam

Once your indie comics masterpiece is complete then printing it is going to be the easiest part, right? Well, think again. While it is a million times simpler than it has been in the past, it still requires some knowledge and a little bit of thought as to how you send your work to be turned into a printed masterpiece, as well as the type of book you will receieve back from the printers. To help guide us through this final stage we have a complete guide from Adam at Mixam to explain how to print your comics, because it’s actually a heck of a lot easier than you’d think.
How to Print Your Comic with Mixam
Unfortunately, the print industry in general has bamboozled us for years, making out that print is this really complex process. Ok, it’s a little more art than science at times. But once you get your head around what bleed is, the rest is relatively easy.
But that doesn’t stop things from going wrong. So, in this article we’re going to cover absolutely everything you ever wanted to know about comic printing, but were afraid to ask. Or didn’t know that you needed to ask. However if you have any questions, please get in touch with us at info@mixam.co.uk.
Here’s an index of jump links to make your life easy: (these will jump links to relevant sections of the article for easy reading!)
• Comic Sizes
• Print File
• Trim Line
• Bleed Area
• Quiet Area
• Print File Summary
• Papers, Binding and Finishes
• Binding
• Paper Weights
• Paper Types
• Covers and Finishes
• Examples
• Explore all the Options
Comic Sizes
Before you even start drawing your artwork, you should choose what size your comic is going to be. Or if you’ve already produced your artwork, you’ll need to find a size that’s going to suit your creation.
Did you know that comic books have their own industry standard sizes? Let’s take a look at the two most popular first.
US Standard: 170mm x 260mmUK Standard: 157mm x 240mm
Manga Standard: 127mm x 191mm
US Standard is the most popular comic book size, because the US dominates the comics industry, but also because most comic store shelves are designed to hold US Standard sized comic books.There’s something to think about!
So if you’ve chosen a larger size, comic stories may not want to stock your work. Anything smaller is fine of course.
There’s also UK Standard size for the hardcore Brits and Manga Standard size for the weebs. Or you can go with old fashioned A4 or A5. You’d be amazed how many people print A5 comics.
Just to give you an idea of size; in the print factory, US Standard and UK Standard are actually trimmed down from A4, while Manga Standard is trimmed down from A5.
Print File
In this example, we’re going to assume that you’ve decided on a US Standard size (170mm x 260mm) for your comic book.
We are also going to assume that you will be Saddle Stitch (also known as Staple) binding your comic book. More on bindings later.
Let’s take you through setting up your Trim lines, Bleed area, while thinking about your Quiet area as well.
The reason all these areas exist in your print file, is because your comic art is about to go through an automated, mass production, printing process through a hulking great machine.
Even the best printing machines in the world require small margins for error as incredibly sharp cutting blades fall, trimming paper to size and resulting in the minutest of movements as hundreds or thousands of sheets are layered up as part of the print run.
So your print file is as much about setting your expectations for your final comic as it is you providing instructions for the person setting up the print machine.
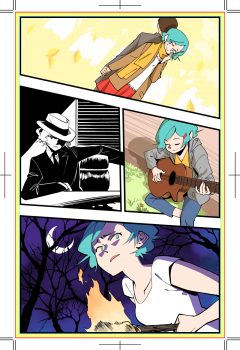
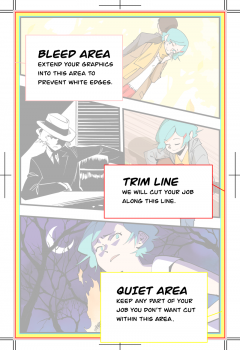
Trim Line
Nice and simple. This is the edge of your design. So if you want a US Standard Size comic, your Trim line will measure 170mm x 260mm.
When your comic book is mass produced, the cutting blade will aim to fall just outside of the Trim line by a fraction of a millimetre or so. This outside area is known as the Bleed…
Bleed Area
Regardless of the size of your comic, your Bleed area needs to extend 3mm out from the Trim line. And your artwork needs to extend into the Bleed area. But with your expectation that this Bleed area could (and will) be cut off.
For example, if you have a beautiful landscape going across the full width of the page, you would want to make this this landscape continued into the Bleed area.
Because if the cutting blade of the printing machine fell just outside of the Trim line by 1mm and you didn’t have anything in your Bleed area, because your artwork ended at the Trim line, you would end up with 1mm of white paper with no ink on it.
This is why you set up a Bleed area.
 Quiet Area
On the inside of the Trim line is the Quiet Area. Some people call this the ‘Danger Zone’. Some people call the area within the Quiet Area the ‘Safe Zone’.
But the reason we call is the Quiet Area is for 2 reasons.
First of all, there’s a slim chance that the cutting blade could fall inside of the Trim line if you’re doing a comic book printing run of thousands and the stack of paper shifts a minuscule amount.
Secondly, and this is the most important reason, it ensure that you do not put anything important from your artwork too close to the page edge.
Text, for example, should never go into the Quiet Area. It doesn’t look very good being too close to the page edge. The same goes for any important artwork details.
Technical Requirements
Because you’re going to be submitted your artwork to an online system, you’ll need to meet some technical requirements, which will help ensure that your comic gets printed how you want it to look.
While some online systems can accept Jpegs and other files, for the best results, always upload PDF files exported from inDesign using the ‘high quality print’ setting. All images should be at least 300 dpi or higher, as anything below this may appear low resolution.
All files should be supplied in CMYK colour. This is because RGB colour files will be converted to CMYK colours for the printing machines, which can result in some colour variations. Although they may be relatively close, the colours won’t match your artwork.
The colour profiles we recommend are ISO coated V2, U.S. Coated SWOP v2 and GraCOL2006.
 Print File Summary
Let’s sum up everything we’ve learned so far.
• The Bleed area starts at the Trim line and finishes 3mm outside of the Trim line
• Keep the important parts of artwork and text inside of the Quiet area
• The Quiet area finishes 5mm inside of the Trim line
• Always select CMYK colours
• Upload your print files as PDFs
• If you have a template layer on top of your artwork, make sure you turn it off before sending your file to print!
Papers, Binding and Finishes
“That’s all well and good,” I hear you cry. “But which paper should I use, how thick should it be and can my comic be Perfect bound?”
“Fear not, citizen!” we say, cape billowing in the wind as thunder roars and lightning cracks the skies. “I shall reveal all.”
As we mentioned earlier, there are a number of pitfalls in printing. Not just with setting up your print file, but also in your choice of paper types, paper weights, adding a cover and applying a laminated finish to your cover. Now is not the time for being frugal! You need to make sure you put the same love, effort and dedication into your paper, binding and finishes as you did your story and artwork.
Always give your comic a proper cover. And ALWAYS give that cover a laminated finish (unless you’re using Uncoated or Recycled paper).
In the sections below we’ll explain everything in detail, but also give you a simple default option for if you just want a simple solution that you don’t need to think about.
Then we’ll wrap up with 3 examples of paper types, weights, bindings, covers, finish combinations which are very popular.
Paper types
There are a variety of paper types to choose from. Typically you would choose a paper type based on artistic expression.
For example, Lorenzo Etherington used uncoated paper in his Art of Stranski books. This really suits his vintage artwork, giving the paper a slightly rough feel and his artwork a slightly faded colour. However, the majority of comic creators use silk paper, which is the recommend ‘default’ option.
Silk – a smooth paper (default)
Gloss – a smooth, slightly shiny paper*
Uncoated – a rough paper
Recycled – a rougher paper with slight texture
* Be aware! Gloss paper is really shiny! Normally this is used in printing for hi res photo books. But if you want your artwork to have high saturation colours and be really striking. This is why some people like to use Gloss paper for their covers (with a Gloss lamination) to be extra shiny and high contrasts to stand out on the shelf.
Paper weights
The typical comic book paper weight is 120gsm, sometimes 100gsm.
GSM stands for Grams Per Square Metre. But for simplicity, let’s just accept that it’s a measurement of paper thickness. The higher the ‘gsm’, the thicker the paper. You can go as low at 80gsm or as high as 170gsm. Typically, this is chosen based on artistic expression and the type of product you’re creating.
Making a 12 sided comic? 80gsm to 120gsm is fine.
Making a 200 sided graphic novel? 100gsm to 120gsm is a better choice.
So there’s an element of scale between paper thickness and the size of your comic book.
But if in doubt, stick to 120gsm. It’s perfect for all comic books great and small.
And when it comes to actually printing on low and high gsm paper stock, I have to say that at Mixam, our paper is top notch, so it doesn’t really matter which one you print on when it comes to quality.
Cover paper and finishes
Generally people tend to choose the same cover paper type as their page paper type. Cover papers are much thicker than page papers and vary between 170gsm and 350gsm.
How thick should your cover be?
It depends on the paper you chose for your pages. Although you don’t need to make your cover stupidly thick in order to be good. A comic with 120gsm pages and a 170gsm cover will do the job quite nicely. Or a comic with 100gsm pages and a 200gsm cover should be fine.
If you wanted a comic with 80gsm pages and a 300gsm cover, you’d need a lot of 80gsm pages to bulk it out so that you could actually open and read it easily! The thicker the cover, the more effort it takes to open if you have a low page count. So there’s something to bear in mind.
If in doubt, stick to 100gsm to 120gsm pages and a 170gsm to 200gsm cover with a Matt lamination.
Which leads us on to finishes, also know as laminations.
Matt lamination – a matt protective coating
Gloss lamination – a shiny protective coating
These are the two standard laminations. One gives a flatter matt finish, the other a shiny gloss finish. Obviously you choose your cover paper type, then apply a finish to it. So you could choose a Silk cover paper and give it a Matt lamination for a very ‘matt’ finish. Or choose a Gloss cover paper and give it a Gloss lamination to make it super shiny!
Uncoated paper, as it’s not coated with anything, doesn’t come with the option of a lamination. The same goes for recycled paper, which is a different kind of uncoated paper.
Why should you always laminate your cover?
First, it makes your comic look far more appealing to customers. Second, and most importantly, it helps to prevent scuffs, scratches and other damage which can occur in packing, shipping and handling over time.
Although for comics printed on uncoated or recycled paper it’s acceptable for them to look a bit tatty over time as part of their rustic/rough/vintage/scrappy artistic feel.
Binding
This is where things get interesting, because your binding is often determined by your page count and overall thickness of your comic book.
Most comic books are staple bound, while many indie creators love their comics to be Perfect bound and get that lovely square edge. There are three typical types of binding for comics:
Saddle Stitch (Staple) Bound – Held together by 2 staples
Perfect (PUR) Bound – Like a soft back book
Case Bound – Another name for a hard back book
Most creators have staple bound comics, because they’re typically quite small 12 pages (24 sides), but comics with 36 or more pages will have the option of being Perfect Bound. It’s like a softback book with a square spine. It’s really nice. But you need to reach a higher page count in order to make your comic thick enough to be Perfect bound.
It’s dependent on the overall thickness of the comic, because all those pages need to be bound against a square spine. If you have too few pages glued against a square spine in a manufacturing process, the pages can fall out – Which is why there’s a restriction in place to ensure you have enough pages or enough ‘thickness’ in overall paper.
You can actually ‘cheat’ and create a Perfect Bound comic with only 24 sides (+4 cover sides), by increasing the gsm of your pages to 200gsm. This gives you the minimum ‘thickness’ required for the system to allow you to use Perfect binding.
Cost wise, Perfect Bound is more expensive than banging 2 staples through a few pages. But it makes your comic look amazing! That’s our personal opinion anyway. But if you’re working to a budget, there’s absolutely nothing wrong with Staple Bound. The vast majority of comics are Staple Bound.
Finally, Case Bound is for something a little more special. Mostly due to cost. Like Perfect Bound books, you need at least 24 sides at 200gsm to access this type of binding. The more pages you have, the lower your gsm can be. For example, at 115gsm you need at least 40 sides. Case bound is expensive compared to Perfect bound and Staple bound, which isn’t surprising, which is why most people only use it for really big collections.
Although we do have an example below of a small Case bound comic book.
Examples
Now to put all this knowledge into practice and create some examples of popular comic configurations. we’ve created some good quality specifications below.
1) Standard Staple
20 sides
Staple binding
Silk 100gsm paper
Silk 170gsm cover paper with a Matt lamination
Pretty much the typical comic print set up you’d expect to see.
2) Perfectly Pretty
40 sides
Perfect binding
Silk 100gsm paper
Gloss 170gsm cover paper with a Gloss lamination
Whenever people go Perfect bound, they seem to like a gloss cover with a gloss lamination while having Silk pages. It looks really good and gives a premium feel.
3) A Fine Vintage
24 sides
Staple binding
Uncoated 70lb text paper
Uncoated 80lb cover paper
People who go uncoated (or recycled) tend to go for thinner paper, creating a more rustic feeling product. Uncoated cover paper cannot have a lamination, but this isn’t so much of an issue, as the ink soaks into the paper quite nicely, while Silk or Gloss papers are more susceptible to wear over time.
Explore all the Options
Come and have a play with our instant price calculator.
Don’t worry, you don’t actually have to buy anything, but you can goof around with all the different options to see what’s available. The prices also update instantly, so you can see what impact a change in paper type or paper gsm can have on the overall cost. Most importantly, you can “game” the system to get the best value for money. Hey, I just noticed that a 300gsm cover is cheaper than a 200gsm cover! And Silk paper is cheaper than Uncoated paper. This is because the cost of bulk printing isn’t always logical, it’s often determined by supply and demand. Have a play and see what you discover.
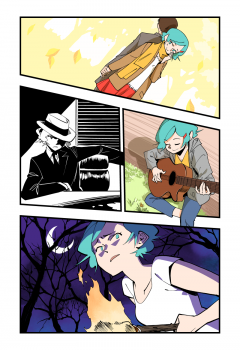
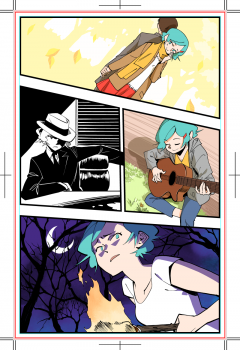
Print file artwork by Sires Jan Black. Printed examples approved by Lorenzo!